Use Obsidian to Manage this Wiki
[!TIP] Quick Access
Date created: 2026-02-15
1. Install Obsidian
This section allows you to load this wiki locally
- Download
Obsidianfrom https://obsidian.md - Drag & drop the
Obsidian.appto your/Applicationfolder - Open
/Applicationfolder, open Obsidian.app- You will be prompted with question to create, open, or sync a vault, choose “Open existing vault”, then navigate to the Dropbox -> BeauchamplLabAtPenn -> LabWiki. Open and load this wiki
- If you are prompted with dialogue whether to trust the plugins, choose “Trust” option.
2. Configure Github (one time for advanced users)
For typical users, it is recommended to login to the MacPro2 server, from which environment has already been configured. You can skip this entire section.
This section allows you to configure and publish the wiki to Github from the scratch (for advanced users). You must obtain the permissions from the repository Admin to obtain access.
Step 2.1: Configure Github SSH Key
Open Terminal.app on Mac, type in bash command
ls ~/.ssh
This command lists the files that configure your SSH. If you see id_ed25519 and id_ed25519.pub, then skip the next step.
If the files id_ed25519 and id_ed25519.pub are missing, run the following command
ssh-keygen -t ed25519 -C "<your_email_for_github>@<email service.com>"
This will generate a public/private ed25519 key pair under the ~/.ssh folder for your Github push & pull.
You will be prompted with the following questions:
Enter file in which to save the key (~/.ssh/id_ed25519):
Enter passphrase (empty for no passphrase):
Enter same passphrase again:
Just enter nothing and press return key to continue.
Step 2.2 Register your SSH pubkey to Github
Open ~/.ssh/id_ed25519.pub, if you haven’t closed the terminal, type in
open -e ~/.ssh/id_ed25519.pub
Find the line ssh-ed25519 XXXXX <your_email@email.com>, copy it to your clipboard.
Open https://github.com, click on your account on the top-right, click on Settings, then SSH and GPG keys, click on New SSH Key, paste the key to the Key field, enter a title to document this key (e.g. MyMacBook). Eventually the page should look like this:
Title: MyMacBook
Key type: Authentication Key
Key: ssh-ed25519 XXXXX my@gmail.com
Click on Add SSH Key
Step 2.3 Configure git-lfs
The repository size is around 2GB, exceeding the limit for a typical Github repository. We use git-lfs to store large files.
Open terminal, cd to the LabWiki folder
# cd /path/to/LabWiki <- IMPORTANT
brew install git-lfs
git lfs install
git pull
Step 2.4 Configure Git on Obsidian
Open Obsidian, use ⌘, shortcut, or click from system tray: Obsidian -> Settings -> community plugins -> Git, look for “Additional PATH environment paths”, paste
/opt/homebrew/bin
Then click on the Reload button below.
3. Launch the website locally
You can preview the wiki website on your own machine before pushing changes to Github. This requires Ruby and Jekyll.
Step 3.1: Install Ruby and Jekyll (one time)
Open Terminal.app and run:
brew install ruby
export PATH="/opt/homebrew/opt/ruby/bin:$PATH"
gem install bundler
Then cd to the LabWiki folder and install the dependencies:
# cd /path/to/LabWiki
bundle install
Step 3.2: Start the local server
The easiest way is to double-click the build.command file in Finder. It will open a Terminal window and start the Jekyll server automatically.
Alternatively, from the terminal:
cd /path/to/LabWiki
export PATH="/opt/homebrew/opt/ruby/bin:$PATH"
bundle exec jekyll serve
Once the server is running, open a browser and visit:
http://127.0.0.1:4000
Press Ctrl+C in the terminal to stop the server.
4. Create a new wiki page
Open Obsidian, use shortcut ⌘P (command+P), or click on command-line icon on the left-side of the ribbon, this will allow you to run quick obsidian commands.
To create a new wiki page, open command palette, type in “quickadd”. You will see
QuickAdd: New BeachampLab Wiki - File Name
Click to open the quick-add widget. You will be prompted to:
- Choose a category — select which section the page belongs to:
- Data Processing and Analysis — protocols, tutorials, analysis pipelines
- Lab Meetings and Notes — meetings, members, orientation, admin
- Publications and Talks — publications, talks, positions
- Resources and Data Sharing — stimuli, code, data sets
- Obsolete — deprecated pages kept for archival reference
- Internal Notes — private notes (not published to the website)
- Page title — the wiki title (used as the heading). The filename is generated automatically by replacing non-alphanumeric characters with underscores (e.g. “My New Page!” →
My_New_Page.md).
The page is automatically saved to the correct subfolder under pages/Beauchamp/ with the right frontmatter (parent, grand_parent) pre-filled for the sidebar navigation.
The new page also comes with a handy “Markdown Cheat Sheet” so you can edit the page without referring to extra pages for styling the documents.
5. Edit existing page
All the BeauchampLab wiki pages are stored at pages/Beauchamp/. You can click to open any page to edit.
The pages are configured to open at reading mode. To edit the file, click on the “Pencil” icon located at the top-right of the opened document, right next to the three dots ....
Current view: reading
   Click to read
⌘+click to open to the right
The pencil icon will turn into a book-icon once you click on it. Now you should be able to edit the document. Click the book again to turn back into reading mode.
6. Insert attachments
The attachments are stored at attachments/. Due to some historical reasons, there are lots of attachment folders and it’s very hard to manage. I created a widget to insert attachments.
Open Obsidian, use shortcut ⌘P (command+P), or click on command-line icon on the left-side of the ribbon, this will open command palette.
6.1 Insert new attachments
Open command palette, type in “quickadd”. You will see
QuickAdd: Upload Attachments + Generate Links
Click to open the quick-add widget, you will be prompted to choose files to attach. You can attach more than one file.
You will be asked to select whether this file is going to be saved. To clean up the attachments storage, the new attachments should be saved to one of the following three locations:
attachments/sharedfor “Large Files”: Github has size limitations for each repository. This folder is used to offload some large files so they are not counted towards the quota. However, the update cycle is slow. The files you input to this folder might be reflected on the wiki website in 14 daysattachments/SmallFilesfor “Small Attachments”: This will count towards the Github size quota. Please do not store files larger than 1MB there. I will receive emails from Github to reduce the repository size.attachments/Publicationsfor “Publications”: This is a dedicated folder where you save the publication PDFs (will count towards the size quota).
The new attachments will be saved to attachments/, and markdown links to the files are automatically generated. This saves the time and errors in creating the links by yourself.
6.2 Insert links to existing attachment
Open command palette, type in “quickadd”. You will see
QuickAdd: Link To An Existing File
Choose this option and you will be asked to select a file to link. You can link to an existing document (wikipage), or an attachment. The markdown links will be created for you.
7. Save changes to Github
If you haven’t configured Git (Section 2), please log on to the MacPro2 to operate
On the left-side ribbon, you should see a Git icon. If you have hard time finding it, hover on each icon and you will see “Open Git Source control”. Click on that icon, and the Git control panel will be opened to the right.

[!WARNING] Always wait for Dropbox to finish sync first!
Always click on the “Pull” button before changing. This will make sure your local repository is up-to-date with Github, otherwise you cannot push the changes to Github

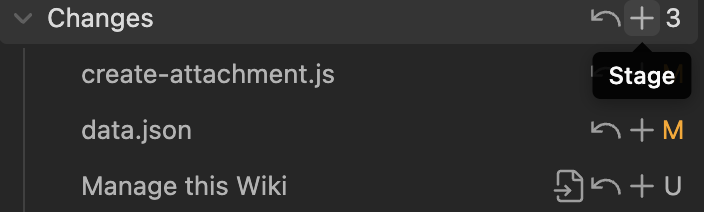
Then click on the “+” sign next to “Changes”: this “saves/stages” the changes you made to the wikis
Finally, click on “Commit-and-sync” button to push the changes to Github

8. Wiki Categories
The wiki pages are organized into the following categories. Each category appears as a collapsible section in the sidebar.
Publications and Talks
Lab publications (with PDFs), conference talks, and information about available positions. See Publications for the full list.
Resources and Data Sharing
Shared resources from the lab including experimental stimuli, analysis code, data sets, and tools released alongside publications. See DataSharing for an overview.
Lab Meetings and Notes
Lab meeting schedules, member lists, alumni, orientation materials, ordering information, and general lab administration pages.
Data Processing and Analysis
The largest category — protocols and tutorials for neuroimaging (fMRI, DTI, TMS), electrophysiology (iEEG/ECoG), cortical surface modeling, stimulus creation, eye tracking, RAVE preprocessing, and software installation. Also includes a Brain Stimulation sub-category for electrical and cortical stimulation protocols.
Obsolete
Deprecated pages kept for archival reference. These describe discontinued services (e.g. BCM CAMRI scanner), superseded protocols, or outdated software instructions. Includes a Lectures sub-category with older teaching materials.
Internal
Internal notes that will not be released to Github.